Form design is often an afterthought when it comes to building a website. But it shouldn’t be. Sales can be lost, leads can disappear, and site visitors can walk away with a negative impression of your brand when you roll out poorly designed or otherwise ineffective forms.
The best design principles for site forms put the user front and center, incorporating critical user experience (UX) standards into the format, functionality, and content. Let’s go over 31 key UX principles that lead to great form design.
1. Welcome Your Form Visitor
To create the best conditions for users to complete your form, you want them to feel good about the process from the start. You wouldn’t jump straight into a conversation with a stranger without first introducing yourself, and you don’t want your visitor’s first impression of a form to be abrupt, either.
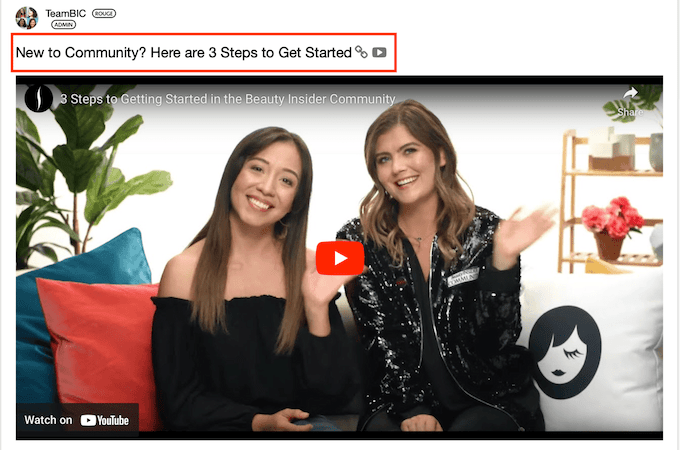
Effective form design starts by welcoming users to the form completion experience and making them feel at ease. Sephora, the makeup retailer, does this really well by including a video that walks the user through the process of joining the Sephora Beauty Insider Community.
2. Show What’s In It for Them
To gain user buy-in, you need to ensure they know the value of completing your form. Tell them the benefits they will gain. Reinforce the item they’ll receive, like a downloadable PDF. Whatever it is, be sure the user knows the why behind the form submission.
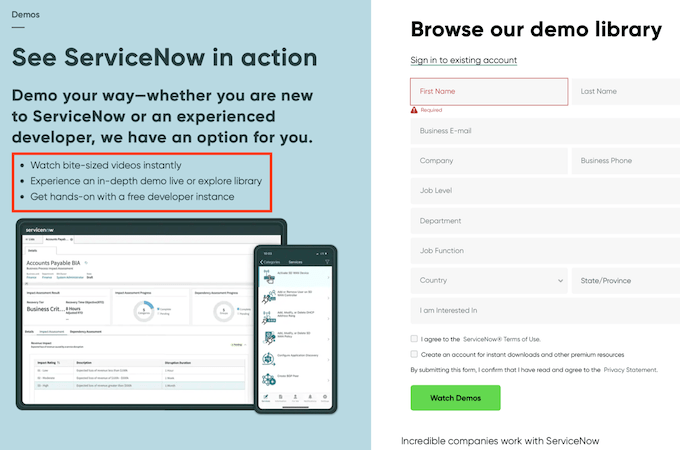
ServiceNow does a great job of explaining to users the benefits they’ll enjoy once they submit the form.
3. Keep Track of User Progress
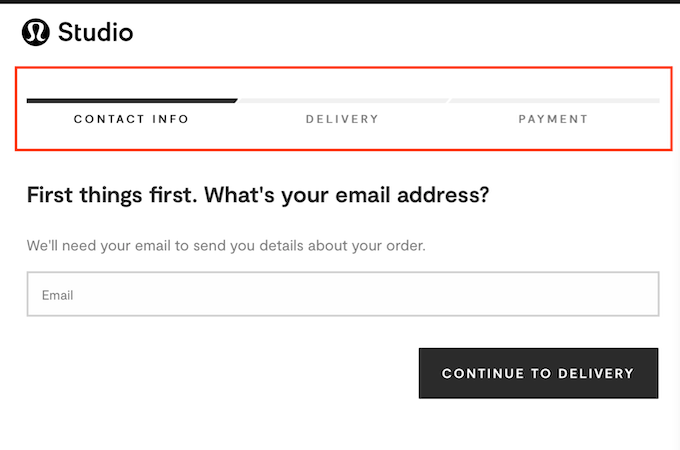
Keep users informed about how far along they are in the form completion process, so they stay motivated to finish and submit the form. The best way to do this is with a progress bar or similar visual at the top of the page. This keeps users aware of how many steps they’ve completed, how many are still to come, and, most importantly, prevents them from burning out before they finish.
Lululemon Studio does this nicely with its simplified progress bar in the shopping cart.
4. Use a Compelling Call-to-Action
Whether you use a call-to-action (CTA) button to engage a user to visit your form or to submit a completed form, don’t bore them with a bland button labeled “Submit.” Leverage the power of that tiny piece of online real estate by labeling it in a more informative and engaging way. Tease the user. Tell the user what will happen. Let the personality of your business shine.
Check out Hulu’s creative use of the CTA, which asks the site visitor, “why not have it all?”

5. Thank the User
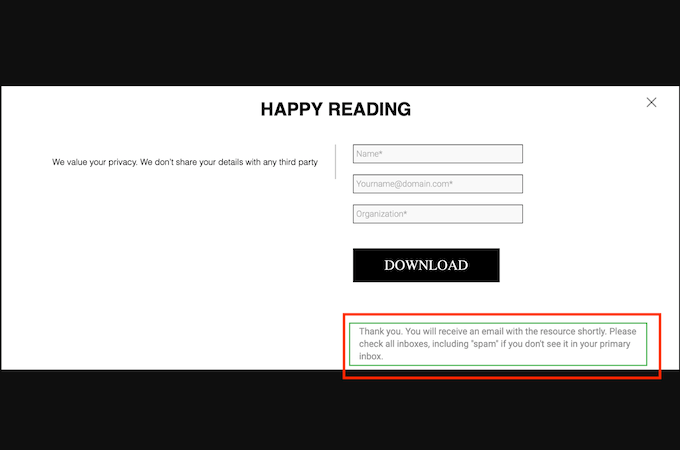
Never leave a user hanging after they click the button to submit their form. Show your gratitude by thanking them for taking the time on your page and explaining the next steps. It’s all part of building relationships with page visitors and nurturing them to become loyal customers.
Xcubelabs demonstrates a simple and effective way to do this, showing it doesn’t have to be a cutesy, exclamatory sentiment to work. No frills, just the information the user needs to know that the form submission was successful.
6. Include Social Proof
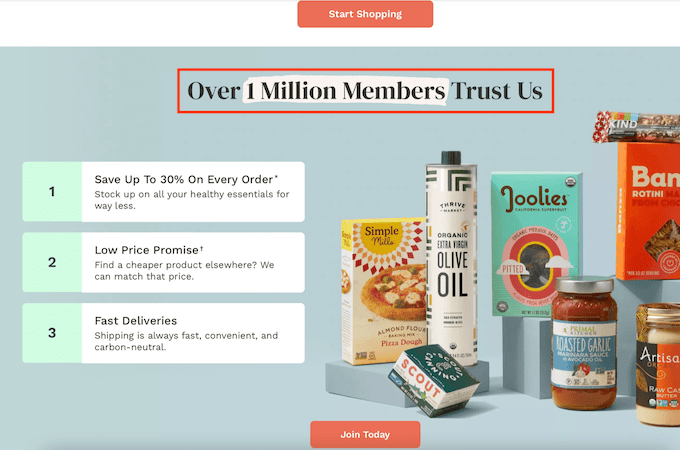
Ensure your visitors understand how credible you are. This can be accomplished with testimonials or other forms of social proof. One very persuasive technique is to include eye-catching statistics or numbers somewhere on the page close to your form CTA.
There are many ways to do this, but one of our favorites is by Thrive Market.
7. Provide Examples To Minimize Data Entry Error
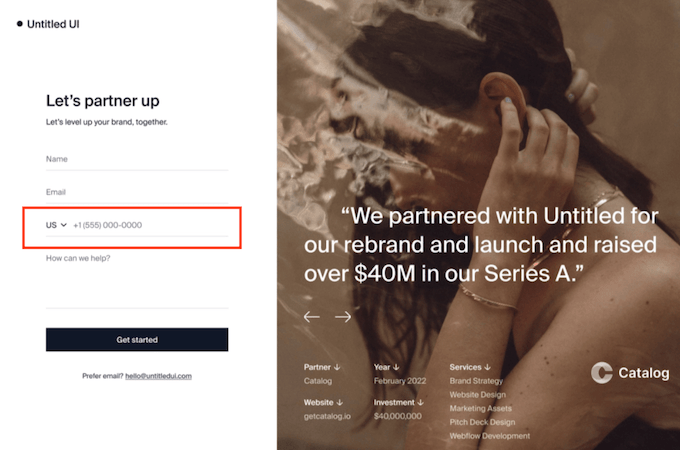
Anyone who has filled out an online form knows the frustration of typing a response into an empty field only to be told their information is incorrect. Reduce the likelihood of these errors by including an example of the correct format for data in the field.
The most common places users make mistakes are the email and phone number fields. When there is a generic example of the right way to enter data in these fields, users know exactly how to proceed. Here’s an example from the Dribbble website we like.
8. Highlight Required Fields
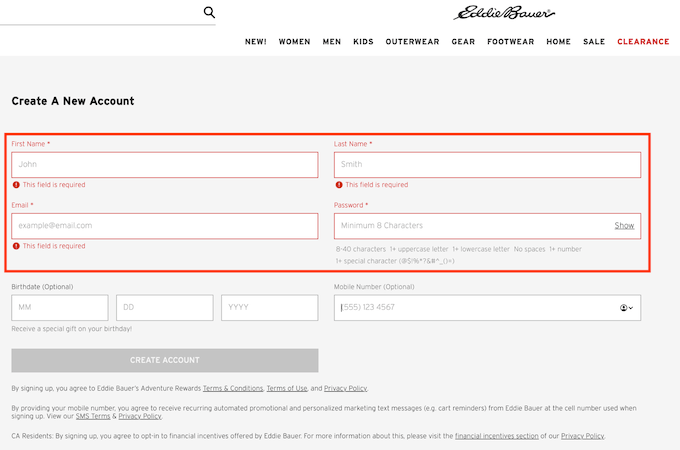
Make sure it is clear which fields are obligatory so that visitors don’t have to redo the form because they skipped something essential. The most common way of doing this is with an asterisk next to the field label, but you can also add a second visual layer.
Eddie Bauer uses a common and effective technique here, highlighting the required boxes in red.
9. Provide Clear Directions for Data Entry
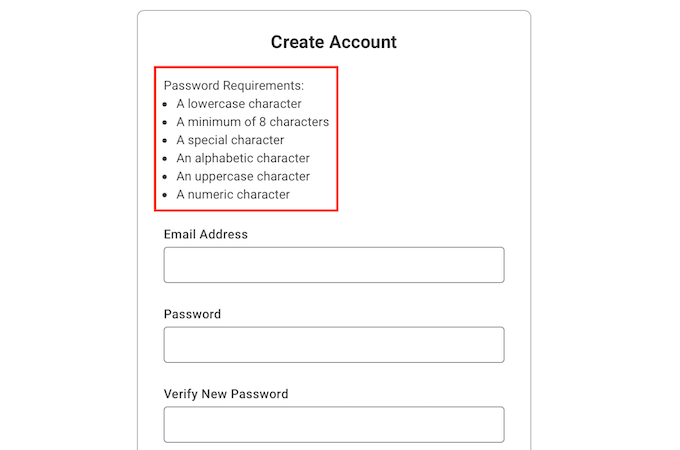
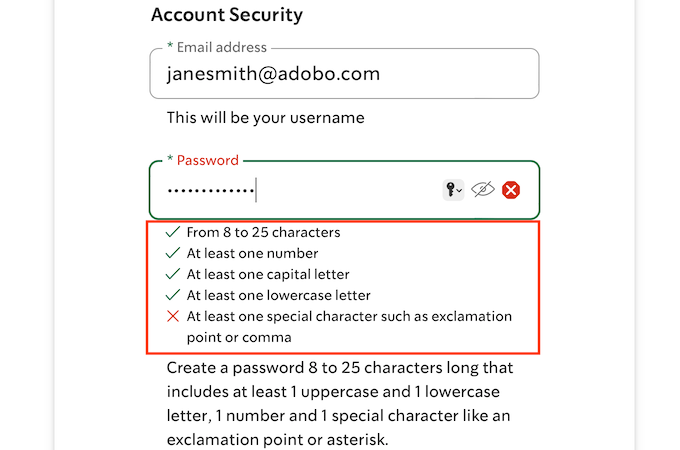
Password creation is another field that is ripe for errors and entry issues. To avoid mistakes, be sure to explicitly describe the parameters for fields like this. Don’t just leave it to chance or guesswork. If users get frustrated trying to fill in a form, they’re likely to abandon the process—and your site—altogether.
Workday does a nice job of explaining how to create a user password when setting up a new account on this job application site.
10. Notify Users Immediately When Errors Are Made
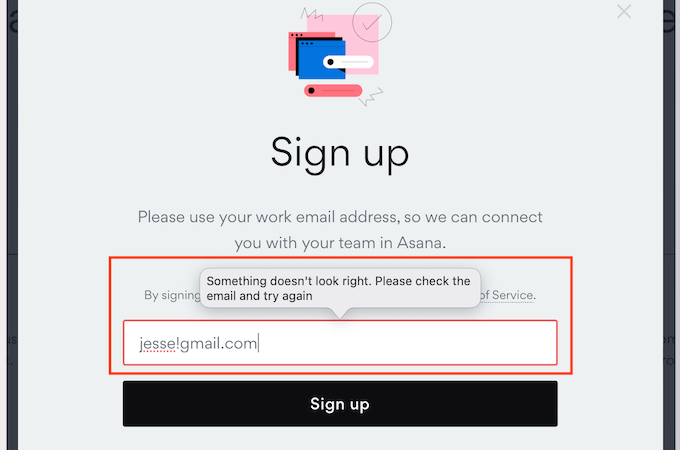
Nothing is as frustrating as trying to submit a form only to find out you made an error somewhere. Rather than making a user scroll up and search for potential issues, it is more effective to alert them as soon as the error is made (before they even click the “submit” button). They can quickly fix the problem and move along in the form submission process.
Here’s how Asana manages it simply and effectively, without needing a click.
11. Provide Positive Feedback
Positive reinforcement is a great way to keep users engaged in the form submission process. One area where this works really well is in the password creation field. There will be criteria to meet, and a user should get real-time visual confirmation of meeting those requirements.
Starbucks includes this type of feedback in their new member sign-up form, turning the red Xs into green checkmarks when each criterion is met.
12. Include Headers and Subheaders
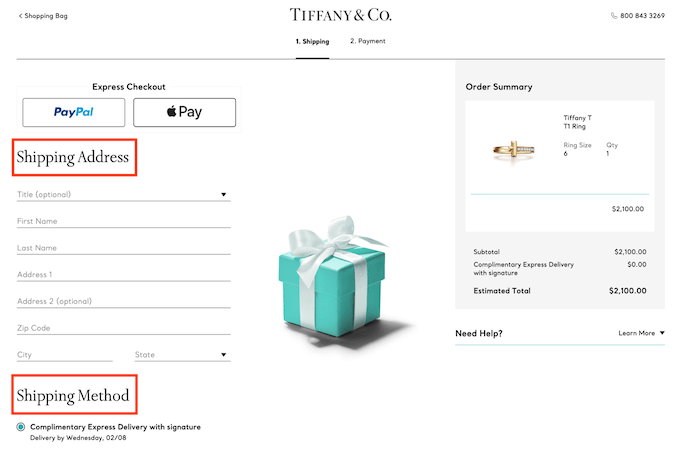
It won’t surprise anyone to learn that users rarely read everything on their screens. The online world is a scan-and-go experience, and nowhere is this more true than in online forms.
Manage this tendency by including headers and subheaders to guide users through each section of your form, as Tiffany & Co. does.
13. Dividers Make the Difference
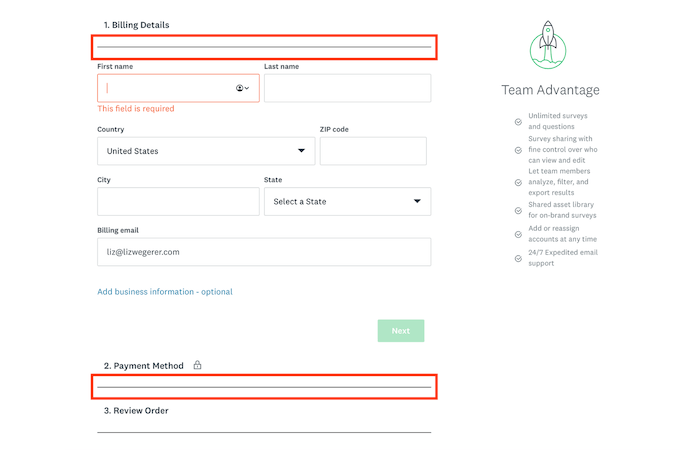
Small graphic elements can make or break form design. Incorporating dividers to group similar fields on your form helps readers tackle smaller chunks of information. It also visually breaks up the form in a helpful way.
One example of effectively using dividers is on the SurveyMonkey site (with the bonus of keeping sections that the visitor hasn’t gotten to yet collapsed).
14. Keep Field Options Intuitively Easy
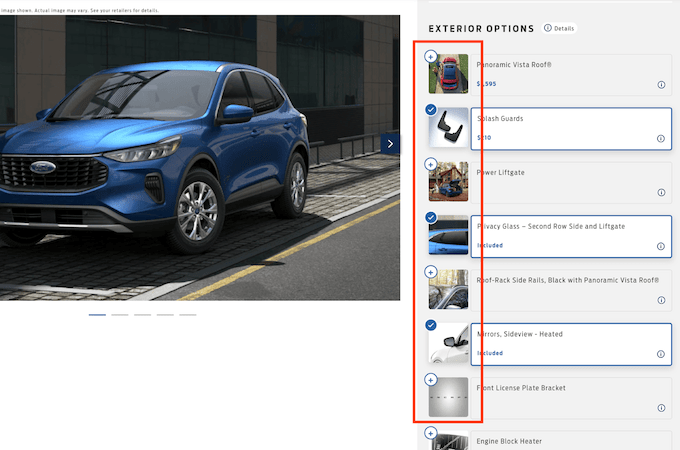
When users must choose only one of several options, use radio buttons. When more than one option can be selected, use checkboxes. These are conventions users are familiar with and intuitively understand how to use. Avoid dropdown menus whenever possible. According to research, this type of selection can cause cognitive overload.
Ford does a nice job keeping form option selection simple when building your dream car.
15. Order Fields From Easy to Hard
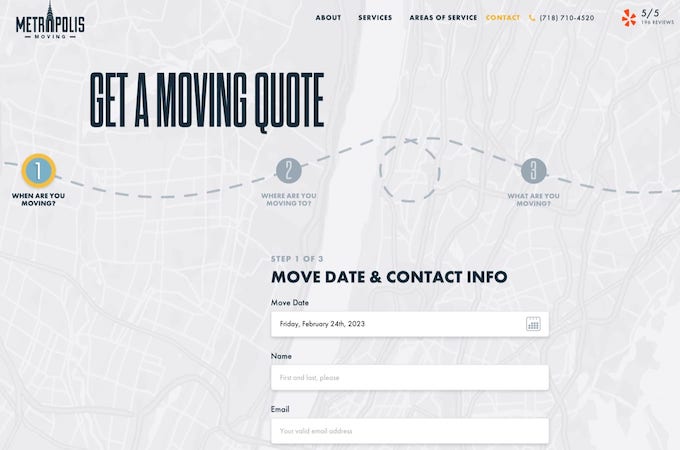
Gain user buy-in by building success from the start, especially if you are designing forms that will eventually ask users to type longer answers into text fields. Momentum builds when you put the easiest responses at the start of your form. By the time users get to the more complicated or time-consuming fields, they’re on a roll and more likely to complete the form.
Here’s a great example from Metropolis Moving.
16. Make It Easy for Users
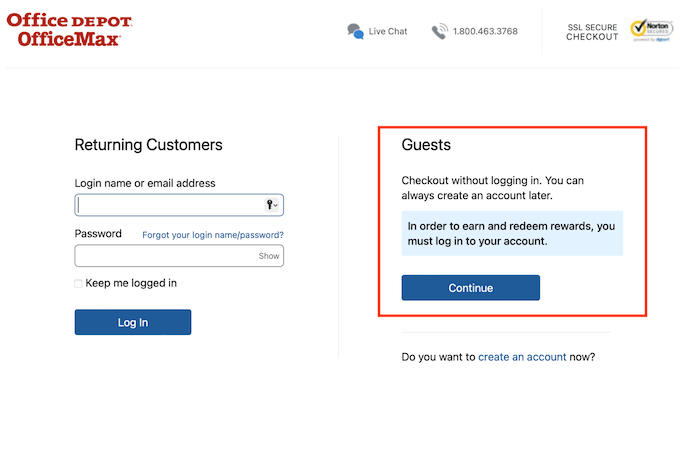
Keep in mind that not every visitor to your site wants to make a lifelong commitment to doing business with you. This is especially true for ecommerce sites. Provide the option to check out as a guest to keep users moving through the process, rather than seeing them abandon their cart in the face of some form of commitment (like creating an account for a one-time purchase).
Office Depot gives customers this option, so buying printer paper doesn’t have to turn into a long-term thing—unless the customer wants it to be.
17. Align Labels to the Top and Left of Fields
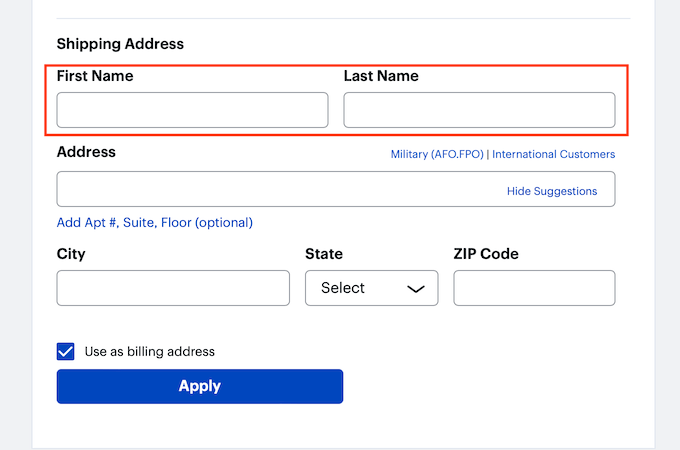
Form design has incorporated field names to the top and left of fields for a very long time. Why? Because it works. Users have come to expect the field label text to appear there. Don’t be tempted to think outside the box for the sake of being creative on this one.
Keep your field labels above and left aligned with your fields for the best user experience, as Best Buy does.
18. Keep Field Length Relative to the Input
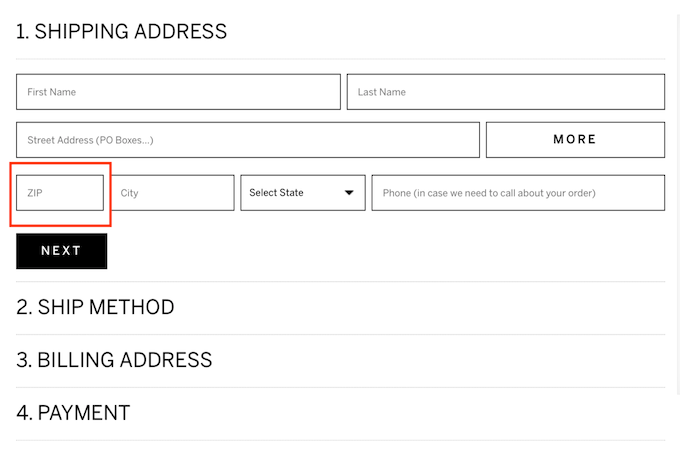
Don’t confuse users by making the zip code field as long as the address field. Each field should be proportionate to the type of data entered in it. Proper field length provides a visual cue to users what they should input, helping avoid errors.
Frontgate does a nice job applying this principle, fitting all the contact information fields elegantly into three lines by using proportional fields.
19. Include Only Necessary Fields
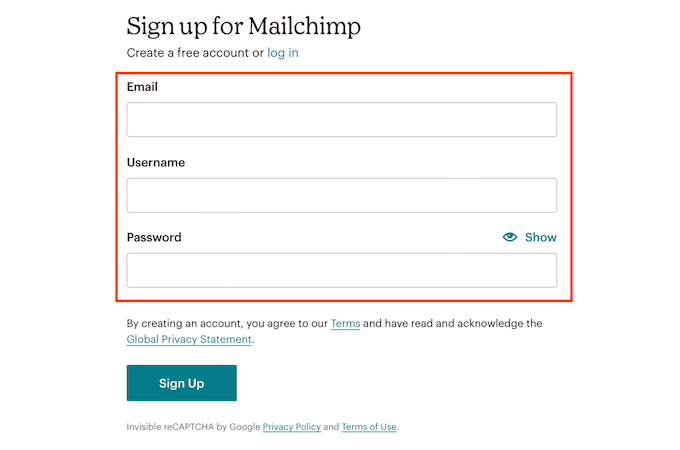
Users are generally hesitant to provide too much information in an online form, even if some fields aren’t required to complete the form. Alleviate this concern by only asking for the bare minimum data you need to process their submission.
Mailchimp gets this principle with their simplified sign-up form that only asks for three pieces of information. There’s no overreach in what they’re asking interested visitors to submit.
20. Make Clear What Data Is Optional
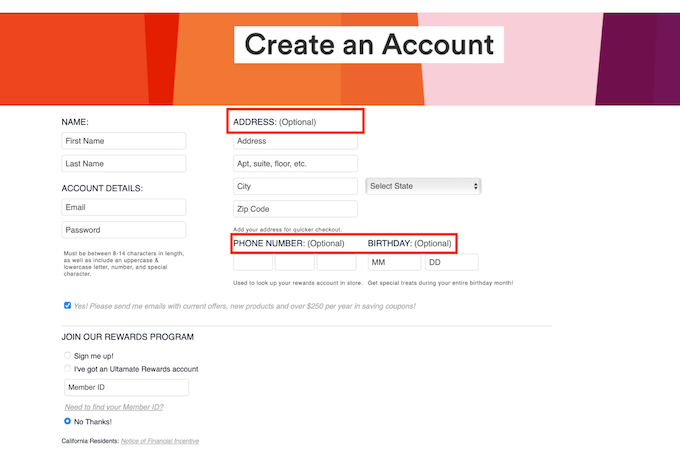
While some users won’t hesitate to provide an email address, those same users may be far less willing to give up their phone number or physical address. If you need that detailed information to fulfill your side of the equation, ask for it. But if it is just a nice-to-have piece of info, make sure the user knows it is optional to provide.
Here’s a great example of that by the cosmetics company Ulta, taking this inverse approach to highlighting mandatory fields.
21. Help a User Out
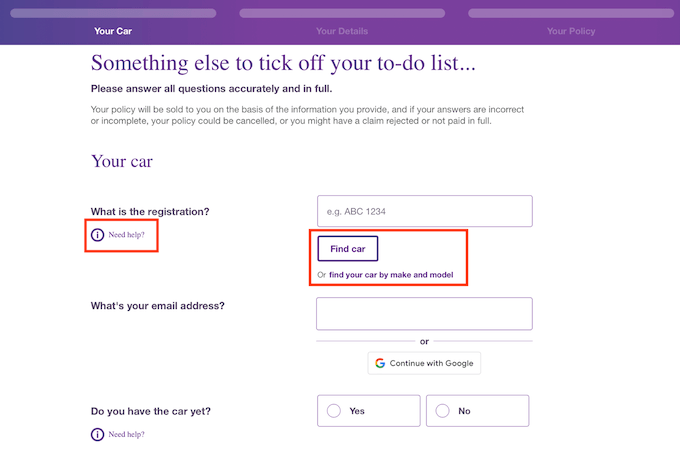
A user completing your form might not always have the information they need at their fingertips. If you can anticipate common hurdles and build solutions into your form, your customers will thank you.
MoneySuperMarket does this well, providing resources for users to access throughout the form when it comes to specific bits of information like a car registration number.
22. Give Users Shortcuts
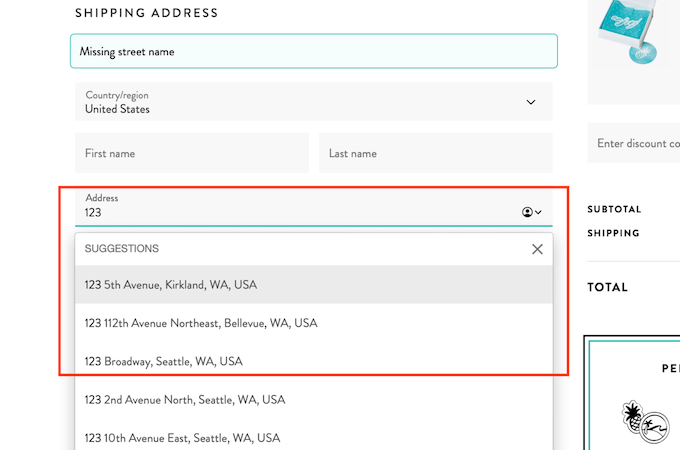
Speed up the form completion process by incorporating helpful hacks like address lookup autofills. When you do, users only have to enter a few characters, then choose the right response. It saves time, eliminating the need to individually type in a full street address, city, state, and zip code.
Here’s how the jewelry company Pura Vida does it.
23. Keep Users Focused
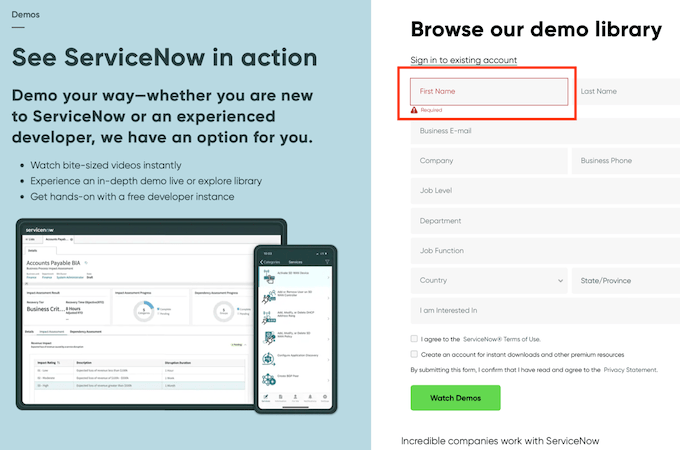
Walk users through form completion by using autofocus. This helps visually guide users from field to field, so they can more quickly enter the necessary information.
ServiceNow includes a red box to direct the user to where to begin.
24. Maintain Form Integrity by Restricting Actions
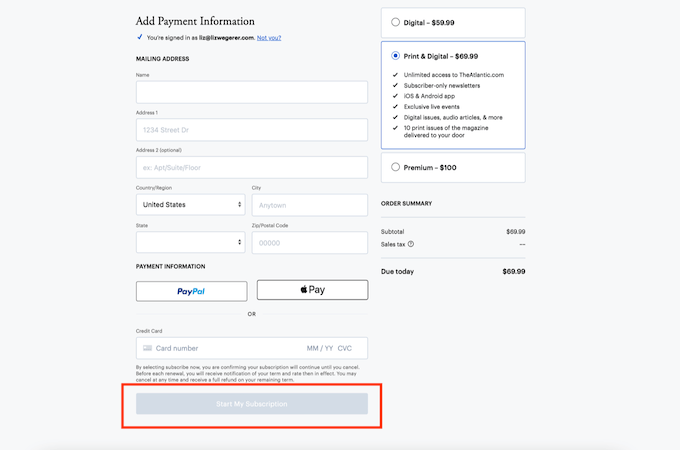
Avoid the annoyance of having users submit incomplete forms by eliminating the CTA button’s functionality until the form has all the necessary information entered.
The Atlantic does this in an unobtrusive way by keeping the “Start my Subscription” button unclickable until all required fields are completed.
25. Preemptively Address User Concerns
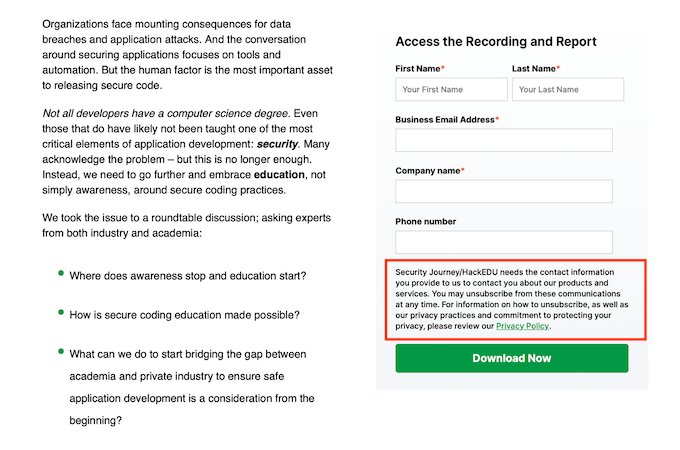
Users are already hesitant to give personal information on an online form. Make it easier for them to get past any hurdles by explaining why you are asking for certain data, like a birthdate or other sensitive information. Explaining why you need that particular info builds user confidence.
The way Security Journey does it makes their rationale crystal clear.
26. Use Short, Engaging Copy
Online form design is not the place to wax poetic. Saying what you need to say in as few words as possible wins over users and keeps them focused on completing the form. Keep the copy personal and friendly, and use an active voice. Talk to users the way you’d talk to someone you know.
Here’s a great example from Duolingo. They traded out copy almost entirely for colorful icons that keep the form completion process flowing and fun.

27. Consider Colors Carefully
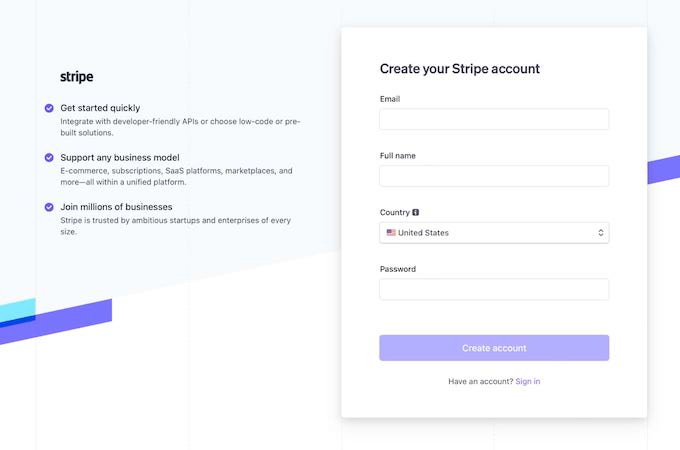
Great form design keeps things as simple as possible, and this includes readability and visual appeal. Fewer colors are better than more. Avoiding text colors not easily seen by the colorblind—like red/green or blue/yellow— is also a good practice.
Here’s a simple, streamlined approach that really works from the payment processing giant Stripe. Minimal colors are used (just little pops of the brand’s trademark blue and purple), and there is a drop shadow on the form to subtly call it out.
28. Emphasize the Good Stuff
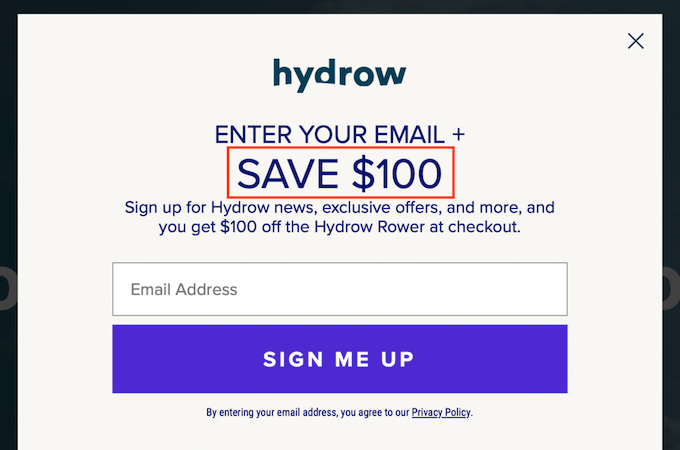
I mentioned earlier the need to show visitors what’s in it for them if they complete the form. Beyond that, make sure site visitors are immediately aware of special offers, free trials, or discounts designed by making the incentive unmissable in your form’s design. There are many ways to do this, and how you approach that callout should flow from your brand identity.
Here’s a great example from Hydrow. Its $100 savings offer is big, bold, and front and center.
29. Design Your Form for Your Ideal Buyer Persona
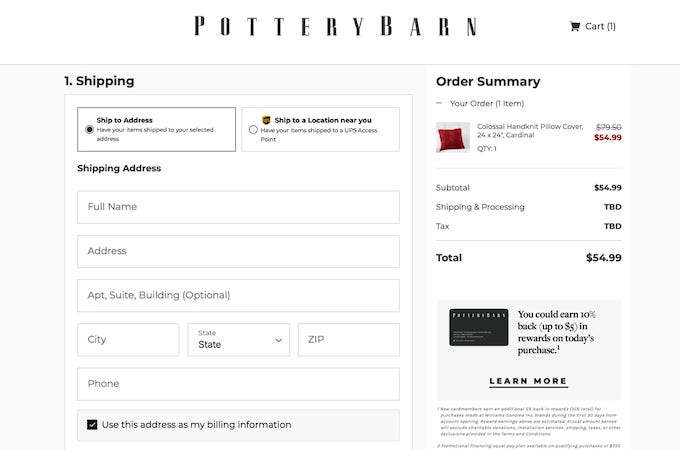
Keep your perfect customer in mind when designing your online forms. An athleisure website’s shopping cart will have a far different look than an accounting firm offering a downloadable form or software platform. Design to appeal to your ideal customer and build credibility into the process.
Like their brand, Pottery Barn understands this concept and keeps its customer checkout clean and minimalist.
30. Stick to a One-Column Layout
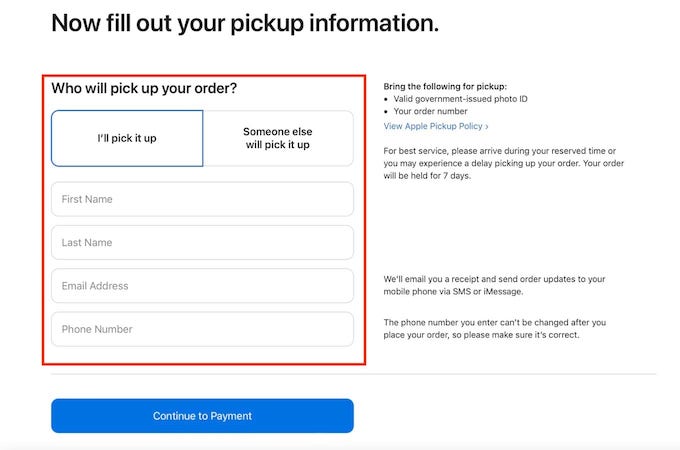
Keeping forms short and sweet is the goal, and nothing is more streamlined than a single-column form. Users are accustomed to seeing them, and that layout is easier to process. If you need to cram multiple columns onto a single page of your form, re-evaluate the information you want and consider a multi-screen form instead that uses a one-column approach on each screen.
Take a cue from Apple, an industry leader in simplifying and streamlining the user experience.
31. Design Mobile-Friendly Forms, Too
According to Shopify, almost one-third of internet users in the United States bought something every week in 2021 using their smartphone. Make sure the user experience you give your customers is as good on their smartphone or tablet as it is on their desktop.
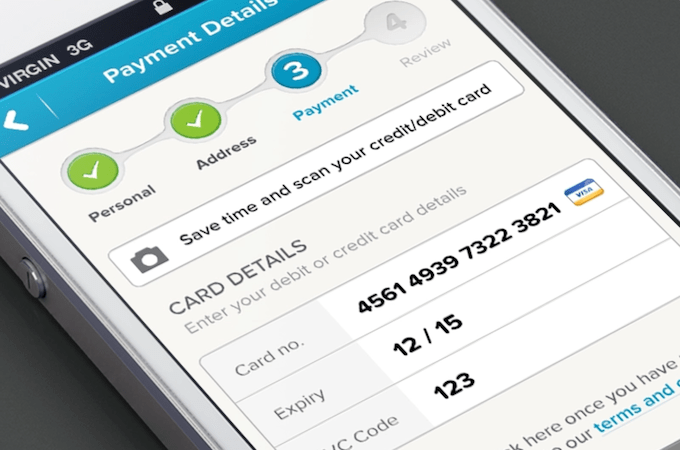
Murat Mutlu’s design on Dribbble does a nice job of optimizing the mobile shopping experience, including the option to scan a credit card for payment.
Final Thoughts
Designing great forms is about more than just making things look nice. Many important elements must be considered before any form goes live on your website.
The great news is that this is easy to do. When you follow the key principles of UX design listed here, you’ll have killer forms that easily convert users into customers.
